I made this card to enter into the Anyone for Anya - Colour Challenge and this weeks Sketch Saturday #137.
This lovely Anya image was coloured with Promarkers.
The sentiment is a stamp from Whimsy stamps, used along with the ticket die in my Cuttlebug.
Embellishments used were various size paper roses, a couple of punch out swirls and two pearl headed pins.
Thursday, 13 January 2011
Sunday, 9 January 2011
Woo Hoo !! Yippee !!!
I can hardly contain myself I have just ordered a load of Copic markers, I cant wait for them to arrive so that I can have a play.
I have been looking all over bloggy land and studying lots of tutorials on using them. I will be back soon to show off my efforts.
I have been looking all over bloggy land and studying lots of tutorials on using them. I will be back soon to show off my efforts.
Monday, 3 January 2011
Just a quick post before bedtime
After a day of taking decorations down, cleaning the house and getting the childrens uniforms, etc ready for tomorrow, I only had a short time to craft. Really it wasnt even me making anything, I just helped my daughter to do a bit of jewellery making. Heres one of the bracelets she made, I think she did a good job for a first attempt.
Sunday, 2 January 2011
A little crafted gift for myself
Here's a photo of a lovely soft scarf I have just finished knitting for myself. I cant pretend to be a very good knitter, but I can just about manage scarfs. I recently made one for my daughter and it was so soft and snuggly, I decided to get some more of the same wool and make myself one.
Saturday, 1 January 2011
Happy New Year ! My first post of the year and a quick tutorial.
Welcome to 2011.... I have promised myself that I will spend more time crafting, participating in challenges and keeping my blog upto date this year.
I decided to start by tidying up my craft room and getting it better organised.
Ribbon Storage Tutorial
I usually keep scraps and shorter lengths of ribbon in jars sorted by colours, but its not a very convenient way especially when I want to take it with me to craft elsewhere. I looked on the internet for alternative ways and like the ribbon ring method, But as I am not working and trying to watch the pennies, I decided to make some myself. They were really easy to make ,
,
 ,
, - I cut card to 4cm x 6cm, and trimmed the corners off at one end to give a tag shape.
- Then used cropadile to punch a hole at narrower end, about 1cm in.
- Then I used a ribbon punch to make the slits, punching from one side then turning and punching from the other making sure they meet up.
- I made the slits on some a little longer to fit wider ribbon.
- To finish them a bit neater I used a corner rounder punch on the bottom corners.
Friday, 31 December 2010
Wednesday, 8 December 2010
Third wall painting - A Unicorn
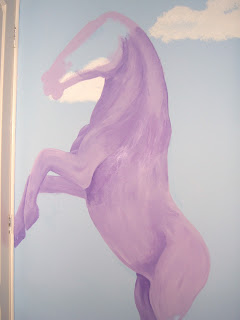
I set myself a hard challenge today...a rearing unicorn.
Thought I would try something trickier yesterday. I know I am no artist, but I am very pleased with the end result and my daughter absolutely loves it.
I started by roughly sketching an outline and then started to fill it with colour a bit at a time.
I worked my way down the body and painted the legs
Then I painted in the face and long flowing mane.
Next the tail...
and finally the unicorn's horn.
Voila!! A purple unicorn that fits in well in my daughters princess and fairy tale theme bedroom.
Labels:
bedroom project,
girls room,
unicorn,
wall art,
wall mural,
wall painting
Sunday, 21 November 2010
Another wall painting
I have painted a banner with my daughters name on, carried by bluebirds. It will be above her bed once I get the furniture back in place.
I started by drawing a rough sketch, you can just about see it.
I painted it pink to match the castle. I mixed up 5 shades to get the shadow and highlight effects.
Next I painted some cute little bluebirds,
and then some ribbons.
Finally I painted in her name. As you can see I'm not very good at lettering, good thing there's only 3 letters
Here's the finished banner.
I decided to paint some birds. You can see in this pic the eraser marks behind the castle where I was going to paint a rainbow but changed my mind. I will have to paint over it with blue again.
I painted some birds,
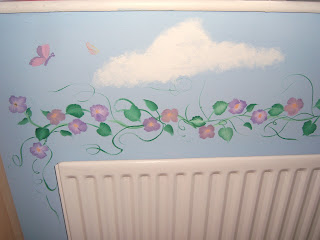
flowers and insects.
These low down ones will be hidden by Mia's bed, but as its a cabin bed she plays under it, so these will be a little surprize for her to find.
The result so far, not sure what to paint on the other walls yet.
Labels:
banner,
bedroom,
bedroom project,
bluebirds,
girls room,
handpainted,
pink,
wall art,
wall mural,
wall painting
Friday, 19 November 2010
My next bedroom project is going to be a little trickier than the last

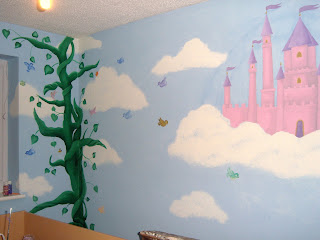
I enjoyed painting my sons room so much that I decided to go the whole hog in my daughters. I am attempting to paint wall murals around the room. This is what I've done so far....
I started by painting the wall blue and adding some clouds all around the room.

Then I sketched a castle and started to paint it pink.

This is the main body of the castle finished, sorry about the photo, but I couldnt block out the sun as I have taken the curtains down.

Next I painted the turrets, flags and a door

A closer look.

Finally I painted in some windows...

and added some highlights...

and Voila !! A fairy princess castle

Labels:
art,
bedroom,
bedroom project,
castle,
clouds,
craft,
design,
fairy,
girls room,
handpainted,
painted,
pink,
princess,
sky,
wall mural,
wall painting
Ross completed bedroom

Here a photo of my sons bedroom complete with new bed and bedding, freshly painted walls, including the camoflage wall and even camoflage curtains that I made and sewn myself. Not bad for a first attempt at curtain making and fancy wall painting.
One problem I have now is that if he stands in his bedroom wearing his Army cadet camoflage uniform, I cant find him. :o)
Labels:
army theme,
bedroom,
bedroom project,
boys room,
camoflage,
wall art,
wall mural,
wall painting
Friday, 5 November 2010
Subscribe to:
Posts (Atom)


